 Hi friends!! Today I want to share with you a tutorial for making poinsettia flowers with satin ribbon. I had learned this from a lady in Assam, when I was in Std X. I love the way these flowers look.Continue reading.......

Monday 19 December 2011
POINSETTIA FLOWER TUTORIAL
Hi friends!! Today I want to share with you a tutorial for making poinsettia flowers with satin ribbon. I had learned this from a lady in Assam, when I was in Std X. I love the way these flowers look.Continue reading.......
PAPER ROSE TUTORIAL
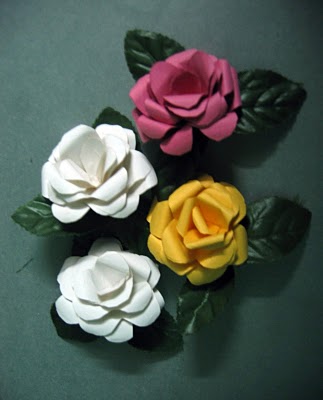
I have used chart papers to make these flowers , The leaves are artificial.
I was surprised at the result. these flowers are too elegant considering how easy it is to make.
We don't even have to be precise, while cutting out the shapes. It gives it a natural look.
Continue reading.....
Thursday 15 December 2011
WINNERS OF CHALLENGE#1
Hi crafters,
i am so sorry for the delay in announcing the winners,i know you all will be waiting for this part eargely:).I was not keeping well for past one week,so that is the reason for the delay.Once again i thank you all who have contributed for our challenge#1,i am really impressed with the support,n hope it continues:)
So without further delay, the lucky winner chosen by Random.org for the prize pack sponsored from my Craft store is:

Tejal for her blingy,blingy beautiful stockings ornament.
Love all the tiny details:)

Khusboo Banka for her beautiful 3d quilled angel.
Love the soft colors n neatness:)

Congratulations ladies,please feel free to grab the badge n wear it with pride:)

Don't forget to join us in our challenge#2,anything but a card for christmas/new year
Happy crafting,

i am so sorry for the delay in announcing the winners,i know you all will be waiting for this part eargely:).I was not keeping well for past one week,so that is the reason for the delay.Once again i thank you all who have contributed for our challenge#1,i am really impressed with the support,n hope it continues:)
So without further delay, the lucky winner chosen by Random.org for the prize pack sponsored from my Craft store is:
No#2.Merlyn
Congrats girl,please mail me your address to kavi_kalalayaa@yahoo.co.in.You have 3 days to claim your prize.
Congrats girl,please mail me your address to kavi_kalalayaa@yahoo.co.in.You have 3 days to claim your prize.
Now on to the top3,it was really a tough choice to narrow down.I had a great time going through all your entries:)
The top#3 for challenge#1 in no particular order is:
The top#3 for challenge#1 in no particular order is:

Tejal for her blingy,blingy beautiful stockings ornament.
Love all the tiny details:)

Khusboo Banka for her beautiful 3d quilled angel.
Love the soft colors n neatness:)

Congratulations ladies,please feel free to grab the badge n wear it with pride:)

Don't forget to join us in our challenge#2,anything but a card for christmas/new year
Happy crafting,
Friday 9 December 2011
CHALLENGE#2"ANYTHING BUT A CARD"
Hiiii,
a very big thank you to all who have participated in our very first challenge:).There were 27 awesome entries,hope you continue the support n expecting more entries this month:)
The theme for this months challenge is
 A awesome christmas gift set from piali,love..love the cute snow man and all the festive colors and embellies.Now who will not like to get this whole gift set..?:)
 A beautiful mixed media frame with clay work,quilling n punch craft.I think this will a beautiful home decor project to decorate your home in this festive season:).

 Priya is so nice,she sent me 4 projects totally to choose from.Here is the 2 projects,one home decor and a gift box.The pretty wreath is so colorful,ans i think its the beat way to use up your ribbon scrap and a cute triangle gift box with can hold little something:).
 Indra always amaze me with her recycling stuffs,and this one is exceptional.Love the decorated tin,big bold poinsettia and the danglers:).
 And finally here is my 2012 calendar:)I think calendar will be the useful gift for anyone during new year,and with a handmade touch..?its a sure pleasure for the recipient:)
So have you been inspired?Visit the personal blogs of the DT members to get more details about their projects.Do play us along this month and please help us to spread the word about this blog.
Happy crafting,

a very big thank you to all who have participated in our very first challenge:).There were 27 awesome entries,hope you continue the support n expecting more entries this month:)
The theme for this months challenge is
Home decor/gifts projects for Christmas/new year
Now isn't it interesting?apt for the season right?
Create a project that can be used for home decor or gifts for Christmas/new year.In other words,ANYTHING BUT A CARD for this festive season:)
Who can play:Anybody who are into any type of arts n crafts.It can be a painting,crochet,embroidery,clay work,paper crafts etc.
How to play:Make a new project(no back linking to old projects) based on this months theme,post it on your blog with a link back to this blog(its must),come back and leave a link to your project(not your blog).You can enter up to 5 entries.Maximum of 7 challenges can be combined including this challenge.
Prizes:At the end of the challenge winner and top 3 will be selected.The winner will get a price package from the sponsor.
This months sponsor is from Imaginationsonline.com, a big thank you for aditya gupta who generously agreed to sponsor this month.
Imaginations is a online store,which has all branded paper crafting products from U.S,you can get everything you need for your paper crafting projects like machines,tools,papers,dies etc.Do check it out HERE.


Now on the projects from our talented GDT members,than you all for the contribution:)
Create a project that can be used for home decor or gifts for Christmas/new year.In other words,ANYTHING BUT A CARD for this festive season:)
Who can play:Anybody who are into any type of arts n crafts.It can be a painting,crochet,embroidery,clay work,paper crafts etc.
How to play:Make a new project(no back linking to old projects) based on this months theme,post it on your blog with a link back to this blog(its must),come back and leave a link to your project(not your blog).You can enter up to 5 entries.Maximum of 7 challenges can be combined including this challenge.
Prizes:At the end of the challenge winner and top 3 will be selected.The winner will get a price package from the sponsor.
This months sponsor is from Imaginationsonline.com, a big thank you for aditya gupta who generously agreed to sponsor this month.
Imaginations is a online store,which has all branded paper crafting products from U.S,you can get everything you need for your paper crafting projects like machines,tools,papers,dies etc.Do check it out HERE.


One random lucky winner will be getting this prize pack.
The content of the prize is as:
The content of the prize is as:
1 Echo Park 6x6 Paper Pack (Be Mine Collection)
1 Imaginations Summer Breeze Paper Pack (6x6)
1 Imaginations Shades of Love Paper Pack (6x6)
1 Metal Butterfly of Pie Lane
1 Pack Transparent Butterflies (Pie Lane)
1 Pack Crystal Beads (Pie Lane)
1 Pack Garden Beads (Pie Lane)
Now on the projects from our talented GDT members,than you all for the contribution:)
Piali from"Touch of creation"
 A awesome christmas gift set from piali,love..love the cute snow man and all the festive colors and embellies.Now who will not like to get this whole gift set..?:)
Pritesh from"Quill me softly"
 A beautiful mixed media frame with clay work,quilling n punch craft.I think this will a beautiful home decor project to decorate your home in this festive season:).
Priya venkat from"Rock,paper,scissors"

 Priya is so nice,she sent me 4 projects totally to choose from.Here is the 2 projects,one home decor and a gift box.The pretty wreath is so colorful,ans i think its the beat way to use up your ribbon scrap and a cute triangle gift box with can hold little something:).
Indira tanwar from"Arty sorts"
 Indra always amaze me with her recycling stuffs,and this one is exceptional.Love the decorated tin,big bold poinsettia and the danglers:).
Kavitha from"Kalalayaa's art studio"
 And finally here is my 2012 calendar:)I think calendar will be the useful gift for anyone during new year,and with a handmade touch..?its a sure pleasure for the recipient:)
So have you been inspired?Visit the personal blogs of the DT members to get more details about their projects.Do play us along this month and please help us to spread the word about this blog.
Happy crafting,
Wednesday 30 November 2011
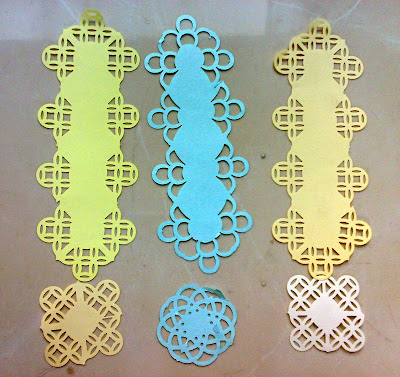
GETTING CREATIVE WITH PATTERN PAPER SCRAPS.
I bet almost all the crafters are miser when it comes to pattern papers,its same with me.I save even a tiniest paper(i mean it) and if you have some small punches n dies you will never be disappointed for hoarding those scraps.Here is my first tutorial on how to use your scraps in a innovative way.
This is all you need..

First cut all the papers in 2 to 3 different size.Distress them individually.

Glue all the pieces individually n start sticking one by one over lapping each other.Since it is in circle shape go ousite the card stock in the corners.Stick in the same style for whole of the card stock,remeber the card stock should not be seen any where.

Once you finish it off,allow to dry for some time and trim the excess in the outer edge.You can either stop with this step and use as it is.Or try the next step to give even more finishing.

I have embossed it with distressed stripes embossing folder,this will help you to merge all the papers well and give as finished look as a single paper.

Tips:
This is all you need..
- Pattern paper scraps
- Distress inks and blending tool
- Circle dies or punches
- Card stock for base&
- Glue
I have used first 2 sizes of spellbinders plain circle dies for this,you can even use some medium size punches if you dont have the dies.

First cut all the papers in 2 to 3 different size.Distress them individually.

Glue all the pieces individually n start sticking one by one over lapping each other.Since it is in circle shape go ousite the card stock in the corners.Stick in the same style for whole of the card stock,remeber the card stock should not be seen any where.

Once you finish it off,allow to dry for some time and trim the excess in the outer edge.You can either stop with this step and use as it is.Or try the next step to give even more finishing.

I have embossed it with distressed stripes embossing folder,this will help you to merge all the papers well and give as finished look as a single paper.

Tips:
- Use only 2 to 3 size of circles,not more than that.
- Stick it in a balanced way with alternate light n dark color n sizes.
- Don't not use a very intricate design embossing folder or a simple one,the former will not allow the pattern paper designs to show off,the later will not be seen at all.Use a medium one.
Visit my BLOG,for the card i made with this:).
Monday 28 November 2011
ANGLE PUNCHING
Don't you just love when you can use your supplies in different ways?that is the one way you can get more out of your money you put in.I was so excited when i watched a video for this angle punching,i spent a whole evening to get it right.Of course this is quiet difficult n i wasted lots of paper for practice,but its worth giving it a try.Since this needs a video tutorial(in which i am not good)i am linking up the orginal tutorials.There are 3 parts one for each design:
Part 1
Part 2
Part3
Here is my take on it:

Part 1
Part 2
Part3
Here is my take on it:


Monday 21 November 2011
FEATURED ARTIST-PRITESH FROM QUILL ME SOFTLY
Hi all,
the first featured artist here in my new blog is pritesh from"Quill me softly".Very recently i came across here blog n i am impressed with her quilling works.In fact,it made me want to start my quilling again.So i thought of asking her to be the first featured artist n she happily agreed.But only after i saw her article i came to know she is good in paintings too.
Over to pritesh...

I am Pritesh (actually, Dr. Pritesh now), working as post-doctoral researcher in Semiconductor Materials Physics division of Royal Institute of Technology, Stockholm. Though a scientist by profession, I can safely claim to have been an artist at heart always.
My earliest memories of practicing art go back to my school notebooks where I used to outline my hand and draw hyper-dense mehndi patterns while waiting for the school bus to pick us up in the afternoons. My mother was constantly upset with me for 'wasting' those pages but I continued. Somehow, I was always bad at art taught in school (I nearly flunked my exam once!). I had my own style and found it very difficult to learn any other.
By the time I was 13-14 yrs old, I was drawing reasonably well. My brother was always the inspiration, being SO good at drawing. I borrowed his colours and brushes and drew a painting which was selected for school display board. I guess, that made me believe in my capabilities.
Serious attempts at Art largely happened during my M.S. at Indian Institute of Science, Bangalore. I was finally 'earning' and hence, didn't feel guilty for spending on Art. IISc had huge open spaces in hostels and I meddled with Rangolis. After I met my (to-be) husband, my Rangoli style changed too, instead of making tendril-rich and floral Rangolis, I started making realistic, life-like Rangolis.
Somewhere around that time, I started experimenting with b/w and colour sketching as well. I was surprised to know my own flair for realistic drawing. While living alone, working as a post-doc at Gent University (Belgium), I had ample time on my hands and I started experimenting with sketching 'people' I knew. And I loved doing those sketches.
Quilling, the latest acquisition in my skill set, was something I had never considered as my cup of tea. My sister convinced me to try it and the first trial itself convinced me that THIS was something I would love to do, for a long time to come.
I read voraciously on the Internet (during my parental leave after the birth of my son) and discovered the blogs of quilling stalwarts like Suzana Ilic and Inna Dorman. I was so stumped by Suzana's creations that I vowed to try to be as close to her quilling expertise as I could manage to. Her unusual designs and extraordinarily good miniature work haunted me, literally. My mind was on a roll and ideas were springing out faster than I could convert them to quilling! I was going berserk! :) And slowly, I bought proper quilling tools. The proper tools made a world of a difference to the quality of quilling I could do.
I quill largely in my spare time (after my son goes to sleep) but am thinking up of new quilling motifs 24/7! LOL.
In partnership with my friend, Sayali, we have started an online venture, Aadyaa Originals to sell personalized quilled creations. We have already made and delivered a few orders, mostly to India. We also plan to undertake realistic sketching (portraits, specially). I am planning to take a break from Science (starting this January) and pursue Art full time. I hope our venture will succeed and we will be able to spread the joy of Art far and wide.
Have a loot at some of her beautiful works..


Friday 11 November 2011
INSPIRATION FROM PRIYA SONDHI
Hi peeps,
i am here with another inspiration for challenge#1 from priya sondhi of My experiments with paper n more.Due to some problem she couldn't send me the pictures on the challenge date,so here it is.A set of 3 beautiful wall hangings,simple yet so beautiful n elegant,love the flowers n butterflies.Hope you will play along with us in our very first challenge,cant wait to see your beautiful entries:))).Come on people,..its time to get crafty:))
Visit priya's blog for more details about her project.

Wednesday 9 November 2011
CHALLENGE#1 HANGING OUT
Hi crafters,
a very warm welcome to our first challenge.I am so excited about the launch of this blog,though its been in my mind for long time i was bit worried whether i will able to spend lot of time on this.But its here finally,n all for good reason.Thanks for the support till now,n hope you all will continue supporting my new blog.
The theme for this months challenge is
"HANGING OUT"
Create something that can be hanged,it can be a wall hanging,a wreath,a door hanger,a Christmas ornament,a mobile and so on..creativity is the limit.Who can play:Anybody who are into any type of arts n crafts.It can be a painting,crochet,embroidery,clay work,paper crafts etc.
How to play:Make a new project(no back linking to old projects) based on this months theme,post it on your blog with a link back to this blog(its must),come back and leave a link to your project(not your blog).You can enter upto 5 entries.Maximum of 7 challenges can be combined including this challenge.
Prizes:At the end of the challenge winner and top 3 will be selected.The winner will get a price package from my Craft store.
Here is the prize sponsored for the winner of the challenge this month from my craft store

Here is awesome inspirations from my friends n myself.
Shalini from craft curry
 A super awesome puffy box door hanger by shalini,love the big bold flowers n leave on the corrugated sheet base.Thank you so much shalini for a superb inspiration:)
Suganthi from Day dreams
 Avery cute n colorful mobile hanger from suganthi mam,love the cute butterflies n the antique bell in the end,thank you suganthi mam for the awesome inspiration.
Kavitha from kalalayaa art studio
 He..he,thats me.I made a frame(wall hanging)in a layout style.I have used a super cute image from wee stamps n lots and lots of flowers n butterflies.
So have you been inspired?Visit the personal blogs of the DT members to get more details about their projects.Do play us along this month and please help us to spread the word about this blog.
Happy crafting,

Saturday 5 November 2011
PHOTO FRAME TUTORIAL
Neha from Steps towards crafting is sharing a photo frame tutorial.
Supplies u will need...
1) Cardboard
2) Handmade sheet/ Designer sheet (lill thick will be better)
3) Scissors
4)Cutter
5) (Optional) Photograph (for size)
so....
Step1:
Take two cardboard pieces...i had made frame for 4'' by 6'' photo so i took 9'' by 11''...but u can take any size depending on ur choice...

Step2: Place the snap in centre of one of the cardboard (lets call it Piece 1)

Step 3: Trace the outline of pic and cut the window from cardboard with size lill less then the actualy tracing from all side so that photo can be holded properly when its ready


Step 4: Now place the Piece of cardboard on the designer paper and cut the sheet with size about 2'' more on all the sides then that of the Piece....

Step 5: Now trace a window and cut it out in designer sheet as shown in picture below


Step 6: Now paste the cut part inside as shown in pic below

Step 7: Now u have to paste the sheet...u can paste it along one of the length side of cardboard or along one of the width as you want to keep your photoframe...This is done in order to make the slot for putting the photo in it...

Step 8: Remember the cardboard Piece two....here comes its use now...
put the piece two on handmade sheet and cut it out such that handmade sheet is lill longer at one side of the cardboard (This side should be the same as the side u had pasted the handmade sheet of piece one...i.e either length wise or width wise...i hope u have got this point..??)

Step 9: Now put piece one on piece two as shown in pic...
 |
| Pic From Front After placing piece one on two |
 |
| Pic From Back After placing piece one on two |
Step 10: Now the last step...paste the three sides of designer paper from piece on at back of piece two...and then paste some paper at the back of piece two so that u can hide visible cardboard piece...
 |
| After pasting three sides of designer paper from piece one on back of piece two |
 |
| After pasting some paper at back of piece two |
 |
| The slot for inserting pic |
 |
| Photo Frame after getting ready |
if u want u can make a small stand too....
Well....friends m very bad at explaining things like this....if u found any difficulty...do tell me...its my first tute so...be gentle n tell me my mistakes....
now some pics that i clicked after making it..


I had made two almost same frames....i forgot to click pics of second one :( but i will get them soon from frnd who took it from it...
:)
So...hws it...pls give ur valuable feedback...
hugs to all...
Thanks for visiting..!!!
Do post Comments..!!!
Subscribe to:
Posts (Atom)